Mandala art drawing
Mandala art drawing and Peacock drawing
Hello everyone,
Hope everyone is doing good. It is a very tedious situation everywhere it's really hard to be apart from families. I miss my hometown it a place where I felt and roamed like a butterfly around my dad, mom, and sister, I miss them a lot. It was peaceful every day and you can see birds and clouds and sunlight and moonlight in an open sky during day and night sometimes you can feel the gentle breeze. And chasing peacock to collect the feathers where it is dropped are some of my childhood memories.
All the childhood memories are in dreams now you can only feel them there, where no one can snatch those little things of lives. Some moments are good at only in dreams in real life the world will teach you millions of lessons every day, every single moment so strives hard to achieve what you want to.
In this post also I did an artwork imagining a peacock. It was a part of my childhood days. While drawing this peacock and mandala it took three days for me to complete this. It will look easy but I did this a little slow and I was very careful not to make mistakes. So here I am presenting mandala art drawing and peacock drawing.

Let's get started with mini-poster boards, pencil, scale, eraser, compass, protractor, micron pen, and more colors and lots and lots of patience.
Steps to follow,
Here I am using the mini-poster board measuring 27.9 x 35.6 cm. Now the first thing is to divide the poster board into four halves like this in image 1. After dividing the board draw the circles using a compass and use the protractor to set the distance for the patterns to make them look even, for this check image 2.
 |
| 1. Take the poster board, scale, and pencil measure and divide them into four halves. |
 |
| 2.Use Compass to make circles and protractor to make the lines and space between the patterns. |
After doing the pencil marks of circles and lines start to draw patterns for the inner circle to the outer and you can use simple and easy patterns.
 |
| 3. Layer one completed |
The pattern on the first layer is just a dark circle like this in image 3. In the second layer, just a small circle and dot pattern for the detailed view check image 5.
 |
| 4.Layer 2 completed |
 |
| 5. Detailed view of layer 2. |
The pattern on the fourth layer is very simple and for the detailed view check image 6. Now below the circle line, small and tiny circles are drawn and over the small circles, another circle is formed. For the detailed pattern check image 9.
 |
| 6.Detailed view of layer 3. |
 |
| 7.Layer three completed |
 |
| 8.Circles and lines over the third layer. |
 |
| 9.Completion of the third layer. |
The third layer completed and the outline for the fourth layer is just made like this in image 11. The detailed view you can get in image 10.
 |
| 10.Outline for the fourth layer |
 |
| 11.outline for the fourth layer |
After the outline fills with the patterns one by one first flower pattern like this in image 12 and the detailed view of the pattern heck image 13.
 |
| 12.Flower pattern completed. |
 |
| 13.Detailed view of the flower pattern. |
After the flower pattern, the leaves pattern is done. For this pattern make simple lines and dots. In image 15 you can see the half-completed leaves pattern. And for the fully completed leaves pattern check image 17.
 |
| 14. Leaf pattern |
 |
| 15.Detailed view of Leaf pattern. |
 |
| 16. Lines and dots filled leaf pattern. |
 |
| 17.Detailed view of the leaves pattern |
To complete the fourth layer small and simple flower pattern is used to complete the fourth layer and for the detailed view of the pattern on the fourth layer check image 19.
 |
| 18.Flower pattern to complete the fourth layer |
 |
| 19.Detailed view of the fourth layer |
Now inside the circle of the fourth layer, small tiny circles are made like this in image 21.
 |
| 20.Small circles over the fourth layer |
 |
| 21.Detailed view of the pattern |
And to complete the mandala circle small leaves and small circle patterns are used like this in image 23.
 |
| 22.Leaves pattern on the fifth and last layer |
 |
| 23.Detailed view of the last layer |
The complete view of the mandala circle is in image 24.
 |
| 24. Completed the big circle. |
Now the outlines are made out of the big mandala circle like this in image 25 and the outline for the peacock is done like this in image 26.
 |
| 25. Outline for patterns outside the circle. |
 |
| 26.Outline for peacock |
The pen-filled patterns of the small circles are done like this in image 27 and the pen outline for the peacock also made.
 |
| 27.Pen finishing outside the circle and pen outline for the peacock. |
For the detailed patterns of the small circles around the big mandala, circle check images 28 and 29.
 |
| 28.Patterns of the two circles in the middle. |
 |
| 29.Detailed view of the patterns in the corner circles. |
For coloring the peacock I used the double-sided fine line and brush marker. Detailed patterns on the peacock check image 30. In image 31 you can see the completed image of the colorful peacock.
 |
| 30.Coloring the peacock. |
 |
| 31.Detailed view of the colored peacock. |
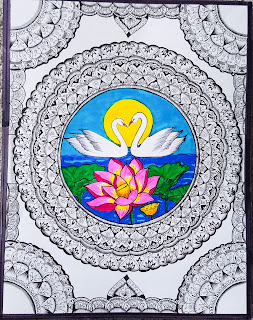
After coloring and shading the dark side and lines of the mandala circles around the peacock and giving the dark outlines to the peacock our final image looked like this in image 32.
 |
| 32.Final image. |
Colorful isn't it? I like the peacock and its background within my mandala circles. After a lot of effort, I got this portrait done. Hope you all like it.
As An Indian, I am proud to draw our national bird. I am feeling very happy to share this post hope you will like it and will try to make your own by getting an idea of the pattern.
Trust in yourself you can do anything better than anyone.

Comments
Post a Comment